Showing posts with label Baby. Show all posts

Monday, 12 August 2013

Baptism Bunny!


It's "Baptism Bunny"!  Sounds almost Superhero, doesn't it.  Like those new age catholics who try a bit too hard to make Church "cool".  But isn't she a peach!  I love that my little design took wings and inspired some more simple designs.  Simple because, like most crafters, I class myself still as a learner.  This is less to do with false modesty than an ongoing desire to learn, improve and create.  It really is the most addictive pleasure, being able to create without a book and a pattern!  Best of all is to become one of those teachers who share easy patterns to the learners out there.  So, I hope you enjoy these really easy little extras for your bunny. x

You will need:
-Any odds and ends of wool (acrylic is a good washable choice for baby drool)
White, yellow, red and black DK cotton for candle
-Size 2.5, 3.00 and 3.5 hook 

Instructions:
Shawl (almost a granny!)
1.       Ch 4 and SS.
2.       Ch 3 (counts as first tr), 2tr in ring, ch 2,
3.       (3tr, ch 2) repeat until you have 4 sets as in a granny square.  SS to top of first chain.
4.       SS along to next ch space, ch 2, 2tr, ch 2, 3tr in same corner space.
5.       Ch 2, 3tr, ch 2, 3tr all the way around.
6.       SS to the top of the ch 3.
7.       Repeat row 6.
8.       SS to next chain space.  Repeat as above but with ch 1 between each set of trebles.
Candle- I used DK cotton for stiffness and a size 2.5 hook
1.       Ch 2, 6sc in sc ch- 6 stitches.
2.       Ch 1, 2sc in each stitch- 12 stitches.
3.       Ch 1, sc in loop closest to you all the way around, ss into first stitch and ch 1.
4.       Sc in a spiral to desired length.
5.       SS, fasten off and stuff firmly.
6.       Make a separate circle to top the candle (step 1 and 2). 
7.       Fasten off leaving a long tail and stitch on.
Flame
1.       Ch 2, 6sc in second chain from hook- 6 stitches.
2.       Ch 1, sc in loop closest to you- 6 stitches.
3.       Continue up 2 rounds.
4.       Sc dec until final stitch, knot tail at the point of the flame and stitch on with black thread for wick.
Dress- Use a size 3 hook for this one

1.       Ch 23 and ss into a loop.
2.       Sc all the way around and join with a ss.
3.       Ch 1 and sc all the way around 3 more rows.
4.       (Sc inc, 11sc, sc inc) x2 and ss at the start- 25 stitches
5.       Ch 1, sc all around and ss.
6.       Ch 3 (counts as first tr), Tr all around and ss into first stitch.
7.       (Ch 2, miss 1 stitch, sc in the next stitch) all around to make a scallop edge.
8.       SS into first ch 2 space.  Ch 3 and 2tr into first space.
9.       Ch 2 into next space, putting 3tr into each chain space.  SS final ch 2 into first stitch.
10.   Ch 1 and sc all around, ( just pop 1sc into each ch 2 space), and ss into first.
11.   Repeat sc all around.
12.   Ch 3 and tr all around. SS into first.
13.   Now for final scallop edge!  Ch3, miss a stich and sc into the next stitch all the way around.
14.   Straps- Press dress flat so that the increases sit at each side.  Attach wool for first strap, ch 1, 2sc across into top of bodice, turn, ch 1, 2sc across.  Repeat this to desired length (approx. 11 rows) and fasten off.  Repeat for second strap and whipstitch into place.
Tiny flower
  1. Ch 4 and ss into ring.
  2. 6sc around and ss into first stitch.
  3. Ch 3 and ss into stitch.
  4. Repeat step three all around and slip stich to the first.
  5. Fasten off leaving a long tail for stitching onto the dress.

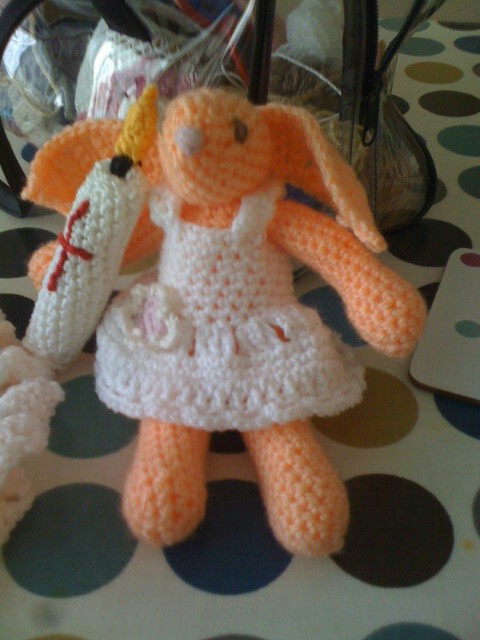
Please have a go and keep an eye out for more Bunny Fun (I don't think I'm going to be able to stop!)

Tuesday, 23 July 2013

Beautiful and Easy Bunny- Either very late for Easter or just REALLY early!

Oh, this bunny is so late!  In fact, he's so late that he should be a white rabbit with a pocket watch... I made him for my baby nieces first birthday.  I had started by making her a rainbow poncho and decided that a little cuddle bunny was needed to finish it off.  Of course, the bunny was so cute that I felt a mini poncho was in order and he's so sweeeet!
I did the usual quick flick through books and free ravelry patterns but couldn't find a really simple and quick bunny so I took a breath and had a go on my own.  I have been holding off posting this as I wanted to use the pattern to check for blips.  The perfect excuse came for my neighbour's baby Baptism.  I just couldn't resist making a follow up"Baptism Bunny" along with candle, shawl and little white dress.  I will add another pattern page for the lovely extras another day.  But, for now, TA DA- here is my first attempt at a crochet pattern.  I offer it up to the www as a gift for all the freeby patterns I have enjoyed as a crafty.  Let me know if anyone uses it- I've already thought of loads of adaptations and outfits for mine...!

You will need:
Any odds and ends of wool (acrylic is a good washable choice for baby drool)
size 3.5 hook ( I used a size 3 hook but I stitch big )

Instructions:
Legs (make 2)

1.      Ch 2, 6sc in 2nd chain.
2.      Continue in a spiral with 2sc in same stitch followed by 1sc. Repeat all round-9 stitches.
3.      Continue in spiral with 2sc in same stitch followed by 2sc. Repeat all round-12 stitches.
4.      12sc, then continue spiral to reach desired leg length (mine were approx. 8.5cm) and fasten off leaving a long tail.
5.      Make leg two but don’t fasten off.  Join with a sc and sc all around to join the two legs (start of the body). 
6.      Stuff legs now and use long tail to close the small gap between the legs.
Body
1.      Continue sc for body up until the point where you decrease for the shoulders (about 4cm).
2.      Smooth flat and aim to put decreases in the side corners.  2dec and 2dec (4 stitches into 2), 8sc and repeat -20 stitches.
3.      Sc all the way around once.
4.      2dec, 8sc and repeat- 18 stitches.
5.      Sc all the way around once.
6.      (2dec,1sc) repeat all the way around- 12 stitches.
7.      Stuff body- Push a little extra at the front for a tummy, but not right to the top of the legs.  This will help your bunny sit!
Neck
1.      Sc all around once and fasten off- 12 stitches.
Head
1.      Ch 2, 8sc in 2nd chain- 8 stitches.
2.      2sc in each stitch- 16 stitches.
3.      2sc followed by 2inc and repeat all the way around- 22 stitches.
4.      Sc all around for 4 rounds- 22 stitches.
5.      4sc, 2dec and repeat 3 times.  4sc to end the round- 18 stitches.
6.      3sc, 2dec and repeat 3 times. 3sc to end the round-15 stitches.
7.      2sc, 2dec and repeat 3 times. 1sc to end the round-11 stitches.
8.      Stuff the head.
9.      Sc all around- 11 stitches.
10.  2dec 5 times- 6 stitches.
11.  2dec 3 times and fasten off.
Arms (make 2)
1.      Start as legs with Ch 2, 6sc in 2nd chain.
2.      Continue in a spiral with 2sc in same stitch followed by 1sc. Repeat all round-9 stitches.
3.      Continue in spiral with 2sc in same stitch followed by 2sc. Repeat all round-12 stitches.
4.      12sc, then continue spiral 2 to 3 times for the hands- 12 stitches.
5.      2dec, 4sc, 2dec, 4sc- 10 stitches
6.      Continue sc around to your desired length (mine were approx. 8cm).
7.      Fasten off leaving a long tail for stitching on.
8.      Stuff, leaving a “pinching” space at the top of each arm to stitch on.  This makes a nice shoulder shape.
Ears (make 2)
1.      Ch 3, sc in 2nd and 3rd chain. Turn.
2.      Ch 1, 2sc in both stitches- 4 stitches.
3.      Ch 1, 2sc in first stitch, 2sc, 2sc in last stitch- 6 stitches.
4.      Ch 1, sc to end.
5.      Repeat 5 rounds of sc.
6.      Ch 1, 2dec in first stitch, sc along and 2dec in last stitch- 3 stitches.
7.      Ch 1, sc to the end. Repeat 3 times.
8.      2dec over last 2 stitches.
9.      Ch 1 and sc around the edge, adding 3sc in the tip of the ear.
10.  Sl st to the top edge and fasten off.
11.  Leave a long tail to sew ears on.

Tips for stitching up
Head-Sew head on before arms to avoid a hunching Bunny!  Use whipstitch to attach.
Arms- Pinch the top and whipstitch shut.  Pull slightly to gather the arm and stitch above and below to add strength to the join.


Sunday, 10 June 2012

Why is there never enough time?!

 I have finally fallen into the category of "Pulling out a favourite pattern" brigade.  Gone are the days when each patterns was new and devoured at great speed, now my time is filled with the ever increasing babies and the gifts that need to be made.  So, again, out come my "Tasty Crochet" book and another picnic pack is created.  Although, I must say that each time, the idea gets tweaked a little and improved. 
As I have two nephews approaching their first birthday I decided that a lunch box for them to tote around with their play lunch would be just the thing!  I loved the mental image of them squeezing the soft toys as babies and growing to play picnics and then using their little bags at playgroups (so grown up!)  Several adults did not seem to get the gift- My husband's side see my crafty gifts as a bit hmmmmm- but hey, it was made for a tot and I know tots LOVE play food!
 Don't you just love the lunch box? A fiver from matalan which was a bargain.  I made a sweet little napkin/ table cloth out of the gorgeous fabric from my recent swaps and it all wrapped up a treat.

And now for a thrifty tip....
In my attempts to Make do and mend I finally had a go at saving some of those beautiful candle holders that I could not bear to throw away.  The rational in keeping these was to clean them out and fill with new candles, sweets or treats and cellophane up with ribbons for a easy Christmas gift (I'm thinking of end of year Teacher gifts...) 
VERY important- Heating in the microwave is a BAD idea!  It seemed so practical but I forgot all about the metal wick holder which immediately started to spark and crackle.  Thankfully I was standing by and pulled them out before the thing exploded.
So, placed in boiling water for 2-3 minutes to loosen the edges and they popped out like removing a jelly from it's mould.  A bit of a wash in soapy water and don't they look lovely!


Saturday, 1 October 2011

Welcome to a special little lady!


The final baby box is on its way out!


There just wasn't enough time to make all the gifts I wanted to shower on this little darling but I put together a special box with some old, new, borrowed ( a returned book) and even something blue! There's even a cookie for big brother from the wonderful John Lewis.


I love the fabric for this bib and this was the least painful of the 3 that I made. (Left-overs made the phone cover that's in shot). I so wanted to make a big blanket to wrap baby up in but was hinted not to so I snuck in a mini blanket "The Mini Snuggly" which is the same pattern but with soft Sirdar Snuggly wool and a much smaller hook-kind of a comfort blanket that can be replaced if lost!


All other pieces have been dotted around in posts through the year....check them out! It was only when I was unpacking the last box from under the bed that I realised how many bits I've been hoarding. Spreading the cost by over planning definitely works for me. I really must attack the Christmas box now and see what I've got!


Wow. I've been making baby gifts for so long now that Christmas seems just around the corner and I have a list of jobs that keeps getting longer but not really started. Thank the Lord that I started earlier this year with my Christmas Tree project. Even though I ended up dropping my decoration each week idea early due to all the babies, it may well prove my life saver this coming festive season. So, watch out for more Christmas posts on their way.


PS- My typing glitch seems to have resolved itself. Weird?