Showing posts with label home. Show all posts

Monday, 4 August 2014

DIY Birthday Party

It's always a bit of a trial having a birthday right at the end of term as the end of year sports days, fetes, reports and crazy clearing classrooms take up every spare minute.  So, this year, Katie and I planned a DIY party which only took a couple of hours in the morning (and a few amazon orders before) to organise.  I think it cost about £30 which included the sundae glasses and spoons (they were on special at Sainsburys- bonus!)
The other great thing was that the party pretty much took place entirely at the dining room table meaning minimal mess, fuss and fully engaged little girls!

Step 1: Party bags 
These plain paper bags were only a couple of quid off amazon last year.  Lots of felt tips and stickers from the craft drawer were pulled out as the girls personalised them with colourful designs and names.  This took a lovely amount of time and when the girls were done, they were surprised by a bowl full of goodies to share out equally.  Lots of team helping here to make sure each friend received one of each little item.  These bits only cost £6 as they were cheap selection packs of 8 or 6 from Morrisons.  They included mini pen, one of those pencils with the changeable nibs, note pad, bubbles, water pistol and stickers.  The big surprise was the pack of Loom bands- the big craze- for each bag.  These were from amazon in bulk and cost only £2 for 6 good sized packs.


Step 2: Pizza making
I bought some pre-made pizza bases for about £2 and used the usual cupboard ingredients to prepare pots of toppings.  Little H and I had fun working together to chop and fill the bowls in the morning and stash in the fridge ready.  We had ham, cheese, olives, peppers and pineapple chunks and a small pack of pepperoni slices.  We all cleared the table for the girls to start the next task whilst I was prepping the tea and tidying the kitchen.

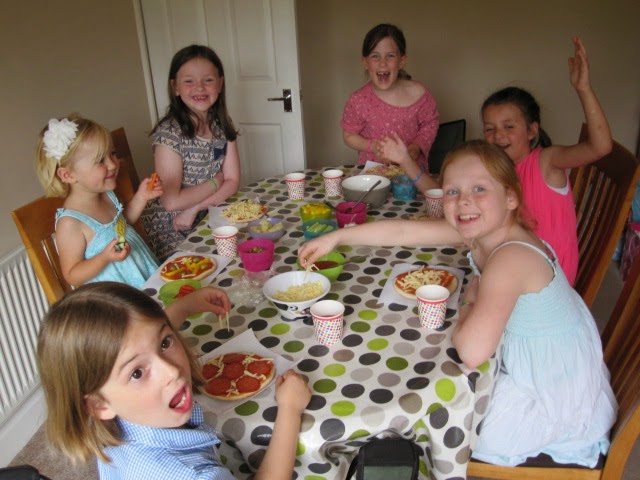
Step 3: Loom Bands!
These are the current craze at school and I love how children teach each other these skills, passing them down and down each year so that the playground games continue for generations!  With that in mind, the girls took out their bands and spent half an hour teaching each other new tricks and beginners skills. I was so proud to see all the girls helped little H join in and have a go at the "Big Girl" game.  Perfect calm as I tidied and got the pizzas cooked and on the plates.

Step 4: Birthday tea.
So now the girls got to eat their fantastic pizzas accompanied with cucumber and carrot sticks.  I've found over the years that the food children make themselves always gets eaten without fuss.  Again, each plate was cleared with exclamations of "Best pizza ever!" and " This is SOOOOO GOOOOD!"  I now had little girls telling me how relaxed I must be as they were doing all the work.  Little girls love to feel industrious and the idea that they were "working" just sold the party even more!  Full of pizzas, the girls gasped as out came the big treat.  Ice-cream, strawberries, blueberries and raspberries all chopped up with a tub of icecream and Mummy in charge of the squirty cream.  The girls thought they were having such a guilty pleasure whilst I smiled at all the healthy toppings, sticks and fresh fruit!  Each sundae was dressed with a dramatic swirl of cream- Yum!

Step 5: The presents
I'm always surprised when you go to a party and the present is received, placed on a table and not touched again until everyone is gone.  I want to see people's faces when they open their gift- especially if I have spent ages making it!  So, on party day, I always have time for the presents.  This was so cute with each friend giving their gift, seeing it opened and gasped about and having a great big hug of thanks from Katie.  Yes, there were many photos of this time, but I'll just share the final friend shot. 
Katie was then spontaneously birthday carried outside for the final treat.  Daddy had arrived home in time for...
Step 6: Toasted Marshmallows!
Noe of the girls had ever had toasted marshmallows before- can you believe it?  they are now complete addicts and adored the slight danger of toasting these fluffy treats until they almost slid off into the hot coals.  Such treats took us until parents came to drag the girls back home.  The happiest little girl was the last one to leave as she got extra toasting time!  We never even got to the birthday cake!

So, best party ever!  Minimum fuss, time, clear up and noise.  Just lots of happy faces and cuddles all round.  Try a little DIY magic yourself one day- it's so worth it!

Monday, 21 April 2014

The Granny of a cushion!

IMG_1433
Attic 24 inspiration
What a lovely cushion!  A while ago I came across more Attic 24 inspiration and decided that it was time to add a bit more colour to my house.  After making cushions for my classroom and past class, I decided that I wanted a super colourful splash on my own sofa, darn it.  Isn't Lucy's cushion so full of spring sunshine?

So, last summer I bought loads of lovely Rowan Cotton DK in my favourite colours.  I used some to create a class bunting (which looks beautiful up by the way) and started creating simple granny squares of my own.

After making a variety of colour combinations, I started to stitch the squares together but it just didn't look right.  So, I had a go adding a pale green border like Lucy used, but my more primary colour choices didn't play well together.
I have always loved the old-fashioned black borders in the shawl worn in "Seven Brides for Seven Brothers" and also in the blanket in Amy's apartment in "Big Bang Theory" (yes, I too look out for crochet items on tv shows) and tried this.  LOVED IT!
 And then came the long wait.....
After a term of non-stop work, I finally took time this Easter to finish the cushion.  Some adding of borders and Lucy's clever joining technique for granny squares meant that my lovely cushy cushion is all done!
Ta! Da! Thanks Lucy for the inspiration...

Monday, 8 April 2013

The jean genie lives on his back!

Yup.  We have a Jean Genie  in the house (although in my mind, it's a girl).  She is talked to each morning as we come down the stairs, makes various journeys around the house by one or both tiny tikes and settles down for the night after the cat goes out.  I was going to add eyes and a nose but she frankly doesn't need 'em!
This quick fix was to help the draft but ended up really helping to deal with the upstairs window condensation issue we always have when it gets chilly.  Thinking about it, it makes sense that the drafty door was sucking in cold air to condense upstairs so this little gem is a great help!  It's so easy to do- I got the idea from "Super Scrimpers" tv show on channel 4.

  1. Cut the legs off an old pair of jeans (I needed both legs to make a super size one).
  2. If using both legs, you will need to re-stitch along the seam to make the legs straight.
  3. Turn inside out and stitch legs together.
  4. Turn back and press.
  5. Gather up some old towels and roll tightly.
  6. Stuff the tube (this takes longer than the rest of the project).
  7. Tie ends ribbon!
This took under an hour with the sewing machine and the ribbons mean that the towels can be reused!

Saturday, 29 December 2012

Delightful Door stops!

I have a new toy!  My hubby bought me a Kindle fire for Christmas after I thought I made it clear that I didn't really have a need or desire for one ( He was right and I love it!)  I've finally worked out how to add a photo- I think - and am slowly trying to post by these pictures of my door stops.
Don't you just love them?  I'm pretty proud of these thrifty little gems.  I've been saving the curtain off cuts to make matching door stops for upstairs and down.  The idea came from the soft baby felt pyramid I made last year (see previous post) but the time came from the hand embroidery which makes them look so delicate.  These were weighted with dried marrow far peas ( definitely the cheapest)
I must admit that I was a bit precious about them at first, worrying that they would get marked/ripped/freyed etc but that changed after a day of giggling girls hiding and running off with them at every spare moment!  Talk about loving anything new...They were even wrapping them up as babies!
Now,with the help of some gorgeous Christmas gifts, my home is finally coming to life.

Tuesday, 31 July 2012

Home improvements- Cath Kidston style!

I haven't been lazy this month- honest!  There's been lots of little jobs to finish and I'm getting into the whole mending thing (there always seems to be something that needs a tweak and a stitch).  Now thatt the holidays are here I've been able to attack some of those jobs that have been on the to-do list for a while.  I planned to jazz up my girl's curtains using my left over bunting fabric and was looking online for applique techniques but actually found a very simple technique in the Cath Kidston "Sew" book that I've been meaning to start since Christmas when I recieved it.  Don't they look fab!  I think I've morphed into Calamity Jane...I remember watching the "Never underestimate a woman's touch" song when I was little and thinking that putting ribbons on a chair was so far over the edge of taste that it was cringe-worthy.  Oh dear, how I have fallen.  I've chintzed up a perfectly simple set of curtains with the girliest fabrics around (Hate them, if you dare!)


Friday, 27 April 2012

It's getting better all the time!

I have neglected my crafts this past few months- sorry.  But I've had a dark few months.  Nothing has happened per say but I've been on a roller coaster of emotions which is finally starting to settle down.  One of the flies in my ointment has been my house.  I've never bonded with it after almost 6 years.  This will make sense to all you ladies out there, I know.  If you don't like your home, you feel without an anchor...
So, after a lot of soul searching, I've decided that this year I must love my house.  After a short visit to my lovely sister's home, I was inspired by every tiny homemade touch.  A name plate for the front door, tea cosies (one was mine!) glass painting and even a beautiful basket for the lowly loo roll.  Some bought, homemade and given meant that her home had a soul and felt loved. 
I think that I've spent so long making things for others that I've forgotten to make this house my home.  2012 marks the year of domestic bliss!
Project 1- Make the curtains fit.
The cheap curtains we bought to "make do" never fit and neither did my nice Next ones from our last house.  So out came the sewing machine and a shaky pair of scissors and...snip, snip, snip they were cut to length.  A bit of steam pressing those hems, pinning and measuring means that each set looks much better.  I really must paint those window sills this weekend though!  I wasn't brave enough to attack my expensive set but happily paid out a few pounds and got them done just right by my local cleaners. (no photo for that one as the room's too dark)


I'm overwhelmed with ideas now and can't wait to make my house a home- wish me luck!

Sunday, 2 January 2011

Let's start as we mean to go on!

Well hello there! I'm a bit of a slow-coach when it comes to technology and have taken my sweet time starting my little blog. But now that my Ravelry page is looking a bit healthier, I decided to have a go at blogging.

Happy New Year to my lovely sister who is my first follower! I hope in time I will get more people peeking at my page so I will try to put lovely pictures on as I go.

For now, here are some pictures of my first sewing machine attempts made a few months ago.

1- For my bunting I used pinking shears to cut the triangles which were then pinned together and stiched together quickly around 2 corners on the sewing machine. Binding tape was folded over and pinned to flags, then run through quickly on machine.


2-I followed the guide for Kirstie Allsops Patchwork Stockings on the BBC website and used my leftover bunting fabric to make these. Not very Christmassy but so cute and I have spare fabric in case I get a surprise addition to the family!